Unleashing Creativity: What to Do with Fabric Scraps

After the holidays, with a tight budget, I’m exploring creative ways to utilize the scraps of materials I’ve gathered over the years. Admittedly, I find it challenging to part with things, always believing I’ll find a future use for them. Whether that labels me a packrat or a hoarder, I’ll leave that question unanswered! This month, out of necessity, I’ve put my collection of wool strips, fabric scraps, yarn balls, and woven fabric pieces to good use, sparking fresh ideas for their creative application. This surge of inspiration has prompted me to share some current crafting projects and future plans with you.

1) Using leftover wool strips to hook a mug rug

I must admit, I am addicted to rug hooking right now and I am eager to learn all there is to know about it. Fortunately, I know someone who has been hooking for years and graciously shared her knowledge and wool stash with me. Using a scrap bag of wool strips (often called “worms” in rug hooking), I designed a mini mug rug for a friend. Who knows, it may end up being used as a decorative feature in another crafting project! This experience taught me to experiment with new colors I don’t usually gravitate towards, work with smaller wool strips, and modify designs based on available materials.
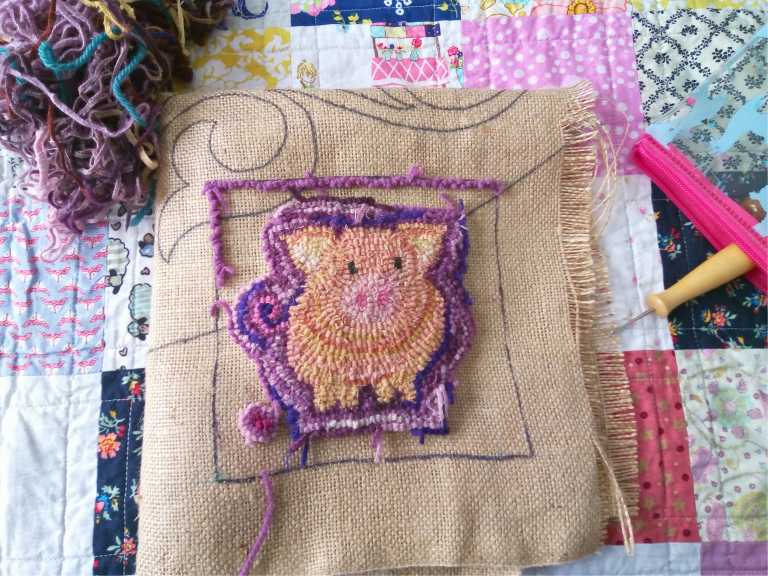
rug hooking pig
hooked pig mug rug

2) Using fabric scraps to make a pincushion and mini quilt

I have a 9×12 plastic bin where I keep all my fabric scraps from previous quilting projects. I limit it to that size to encourage myself to buy only the fabric I need for each project, but it’s still filled with tiny pieces of fabric that I didn’t know what to do with. Recently, I was inspired by a crafting YouTube channel called Crafty Cottage Stitches, which is hosting a #pinkeep social. The idea is to make different kinds of pin cushions using whatever materials you want. It was a light bulb moment for me! My bin of fiber scraps would be perfect for this project. Instead of just using random small pieces of fabric to make a multi-color rectangle and stuffing it with fiber fill, I remembered the Mini Dresden pin cushion pattern by Deidra McCollum from Quilty Obsession that I’ve had for more than 5 years. I was initially intimidated because I wasn’t familiar with hand applique and felt more comfortable sewing bigger pieces of fabric. However, I decided to give it a try. I used Amy Sinabaldi’s free embroidery pattern of a sheep to decorate the middle of the Dresden plate on the front panel of the boxed pin cushion. I can hardly wait to see the final product! Now that I’m looking at it, though, I don’t think I can even use it as a pin cushion—it’s too cute! 😊
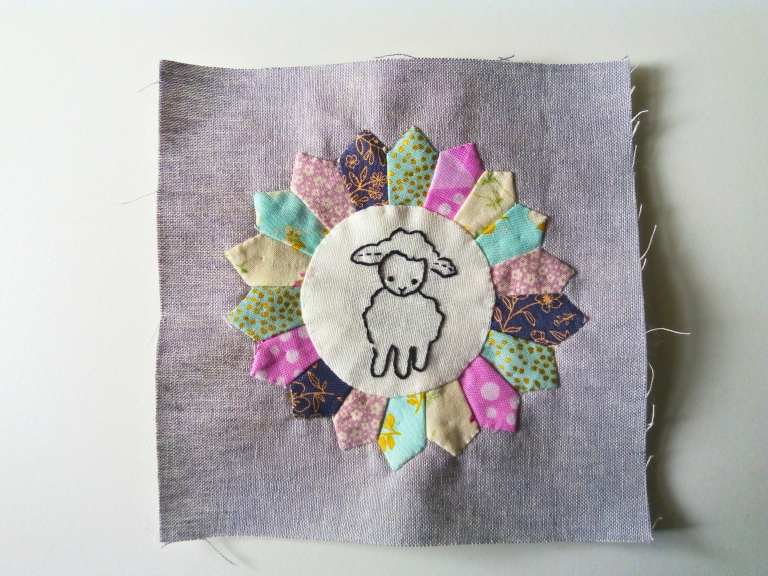
fabric scraps pin cushion
mini pin cushion using fabric scraps

The pincushion wasn’t the only idea that came to mind when brainstorming what to do with my fabric scraps. A couple of months ago, I came across a workshop at one of my local quilt stores called kawandi quilting. After some research, I discovered that it involves hand-sewing pieces of fabric onto a larger piece to create a quilt. As you may know from my previous posts, I’m a big fan of hand embroidery. In fact, my first post was titled “The Great Quilting Showdown: Machine Quilting vs. Hand Quilting.” This is a project I plan to learn on my own, as there are several great YouTube tutorials available, like this one, How to Make a Kawandi Inspired Quilt, that shows you how to do it.

3) Using handwoven fabric samples to make ornaments

Initially, I was hesitant to admit that I might have a tendency to hoard crafting materials. You might think my collection of handwoven fabric pieces supports this idea. However, it sort of fell into my lap, so to speak. My weaving teacher was clearing out her cabinets of handwoven fabric samples and offered them to students like me. At the time, I didn’t know what to do with them, but they were free and beautiful, so I accepted them. Recently, I’ve been contemplating some personal designs that incorporate handwoven fabric. I’m not sure yet what these stuffed star ornaments will ultimately become—whether they’ll be part of a larger design (which I’m leaning towards) or a standalone project. Perhaps I’ll even fill them with lavender or other dried scented flowers. Regardless, I love how they turned out—soft and squishy.
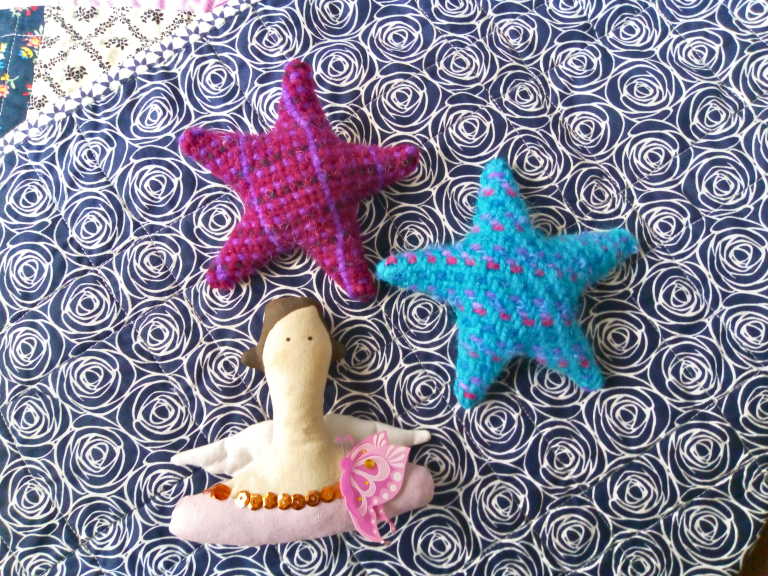
handwoven fabric scrap sewn star ornament
sewn star ornament with hand woven fabric samples

This year, I’ve been focused on expanding my creativity by experimenting with materials in new ways and exploring different design approaches. Projects like the ones mentioned above have been particularly inspiring, and I’m eager to see how they develop in the coming weeks as I continue working on them. I’m committed to staying on this creative journey and discovering what other projects and designs emerge as I let go of the need to strictly follow patterns and instead embrace thinking outside the box. What about you? What projects are you currently working on that involve working with scraps? Feel free to share in the comments below! 

New Year, New Crafting Goals!

Happy New Year, fellow makers! I hope you had a wonderful holiday season. Reflecting on 2023, I achieved many crafting goals, reconnecting with weaving and rug hooking. With the start of a new year, it’s time for fresh beginnings. I feel inspired to set new crafting goals and face new challenges in 2024. While I have exciting plans ahead, I also aim to complete lingering projects from previous years. As time passes, my project list has grown, and it’s time to make progress. Today, I want to share my crafting goals for 2024, hoping to stay focused and accomplish them!

1) Turning hand embroidered pieces into a complete finished object

I’ve been doing hand embroidery for a while now and I enjoy it immensely. It was my first venture into needlework and felt less daunting than cross-stitching. Taking an embroidery class on Craftsy for basic stitches helped too. I’d turn to this craft sporadically when I wanted something requiring less concentration but keeping my hands busy. Over the years, I’ve embroidered a small collection of 6-inch squares using designs from my favorite craft designers like Kathy Schmittz and Sarah Jane. Now, I’m pondering how to best arrange them into a project. I’ve checked the ‘Big Book of Hand Embroidery Projects’ for ideas, but I’m still uncertain about what to do next.

So what is holding me back from making a decision?

  1. How to arrange them in a way to highlight each hand embroidered piece so they do not compete but still go well together.
  2.  Is it practical? Will I use it or store it away to collect dust.
  3. I will have to design a layout especially if I plan to put into a wall hanging or mini quilt.

Decisions, decisions, decisions!!

hand embroidery
6x6 inch embroidered pieces of linen

2) Practicing piecing and aiming for precision in quilting!

A few crafting friends and I decided to take on the Riley Blake Design Block Challenge this year, pushing me to explore more challenging aspects of quilting. I typically stick to standard piecing with straightforward stitching and minimal cutting. As I delve into the challenge, I’ve gone through my fabric stash, considering colors and deciding whether I need to add a couple more fabrics to achieve the desired finished quilt size of around 60 x 60 inches. I’ve successfully completed Block #1, Vintage Delight, piecing together various units to create an almost squared 10.5 x 10.5 block.

quilting block
#RBDblockchallenge Vintage Delight quilting block

3) Weaving more with my handspun.

I’m expanding my weaving projects by using more of my handspun yarn to create fabric for future original designs, like small bags and household décor items. To accomplish this, I need to produce more handspun, but luckily, I have a good stash of fiber. Currently, I’m spinning some vibrant Corriedale fiber dyed by Funky Carolina, enjoying the colors as I spin. Additionally, I’ve acquired new fiber to spin. I’m considering spinning them as singles and then weaving them with another neutral-colored single-ply wool yarn, using a tight plain weave structure.

handspun yarn singles bobbin
handspun yarn singles

4) Rug hooking an original design!

What is my original design involving? Of course, a sheep! Freestyling the drawing onto a piece of primitive linen foundation cloth using a sharpie, the design is approximately 6 x 6 inches and is intended to become a small wall hanging for my craft room. I plan to use leftover wool strips from a previous project, specifically hooking a sheep from the Buttermilk Basin pattern called Patriotic Sheep. Despite struggling to shift focus from this enjoyable project to complete others, it has inspired me to design more rug hooking patterns soon.

rug hooking sheep
my rug hooking sheep design

These projects represent just a few on my to-do list for 2024, and I’m excited about completing them and sharing the finished pieces with you. Despite having a list, I’m leaving room for new inspiration and creativity to emerge. That’s the fun part of crafting – seeing where it takes you. Most of the time, it turns out better than you can ever imagine. What are your crafting goals for this new year? Please feel free to leave a comment below.

Harvesting Creativity: Crafting This Fall Season

Music: Passage by Jakob Ahlbom & Trust in You by AK Silla

Nature is my go-to source of inspiration, regardless of the season. However, I must admit that the changing colors of leaves, the bright autumn afternoon sun, and the pine needles covering the forest grounds rekindle my imagination. I have a strong desire to recreate the mood of comfort, stillness, and crispness that I experience during my woodland walks in the fall. What crafts am I gravitating towards this fall to reflect this change of pace?

Rug Hooking

My current rug hooking  project is from an older Buttermilk Basin pattern called Patriotic Sheep. Using primitive cut wool strips (1/4 inch wide strips of wool) in rustic colours such as burgundy, mossy greens and burnt yellows. As you can see, I still have the main body to work on. I have a variety of creams and white wool fabric waiting to be felted and cut into strips. The final project will be a 3-dimensional sheep that will hopefully decorate my craft room.

rug hooking sheep
rug hooking sheep

Weaving

Weaving with my multicolored handspun using a crackle weaving structure. The pattern is called the French pattern, and it is from Marguerite Porter Davidson’s book, A Handweaver’s Pattern Book. This book has a great compilation of older weaving patterns, but using this pattern along with my multicolored handspun is giving this old pattern new life while preserving the vintage feel and look. I will admit my initial choice of a gray color was more subdued, but I am glad I changed my mind. This fall season is bursting with color, and I wanted my current projects to reflect this.

hand weaving
using my handspun to weave the French Pattern

Knitting

Knitting socks during this time of year, I am obsessed with staying warm and what I can make that will keep me warm. Naturally, my feet are the first part of my body that get cold quickly, and it is not even below 0 degrees. I start rummaging through my yarn stash to find the perfect yarn that is sturdy and warm enough to start a new pair of socks. Then, I finish all the last year’s sock projects by closing the toes and weaving all the loose ends.

pair of handknitted socks
striped hand knitted knee high socks

Punch needle

It is not a craft that I often work on, but I do enjoy it immensely when I do. This pattern is a Michelle Palmer original punch needle design, and of course, I was drawn to it because of the cute sheep design. It was featured in a summer 2019 issue of the Punch Needle and Primitive Stitcher magazine, but I felt the color selections in this design reminded me more of fall leaves that decorate the forest floor instead of summer flowers in full bloom. I have the pattern stretched on some wooden bars for increased accessibility while I am cuddled under some blankets and sipping on a hot cup of tea.

sheep punch needle
punch needle sheep design by Michelle Palmer

Quilting

I find binding quilts takes a long time when I make blankets. But it feels good to be under the blanket while doing it. I usually bind quilts in the fall, after piecing them together during the summer when there’s more daylight. It gets too hot to manoeuvre the blanket while hand-sewing the edges. I feel good when I finish because I have a new blanket to keep me cozy during the winter while I work on other crafts.

What crafts are you drawn to when there is a change of season, especially when the weather gets cooler? Please feel free to comment below!

The Great Showdown: Hand Quilting vs Machine Quilting

Music: I Remember Well by Cody Francis

Hand Quilting Won this Round!

Are you guilty of having a pile of wips! I have a pile for every craft. I try to keep them at a minimum, but I often fail. I can be easily distracted like a squirrel with a shiny new object with the other new exciting projects that I want to work on right away. Recently I rediscovered a quilting project using leftover fabrics scraps from an adorable fabric line from Dashwood. The quilt top was finished and it was intended to be sold as a baby quilt in my Etsy shop. The next step was to quilt this beauty either by sewing machine or by hand. Time was not a factor in this decision. I knew for certain that I wanted to accentuate the beautiful bright bold colours in this quilt. When I checked my machine thread collection it was mainly neutral colours but I desired colours that were BOLD and BRIGHT. I felt this look could be achieved by using thicker weight thread called perle cotton which I use often in my hand embroidery. After a brief Google search and watching a YouTube video on big stitch quilting, I decided that hand quilting was the perfect choice. Here are my reasons for choosing hand quilting for this project: 

1) Stitching was more defined

The thicker thread stood out more especially against the bold, intense fabric colours. I used perle 8 embroidery thread (equivalent to 2 strands of embroidery floss held together) instead of the larger size, perle 5 (equivalent to 6 strands of embroidery floss held together) because it was less overwhelming to the eye. I used clover’s embroidery needle size #10 to thread the needle. The brand of threads used were a combination of DMC and Wonderfil which I purchased either from my local quilting shop, The Country Clothesline or Michaels.

2) Switch thread colours quicker

With threading several embroidery needles at once, I was able to switch thread colours quickly vs changing bobbin thread and spool of thread for every ½ triangle I was going to hand quilt. Plus, if I accidently used the wrong colour, for example using the same colour as the adjacent 1\2 triangle, it was quicker and easier to pull the stitches out without reaching for my handy dandy seam ripper. Even though the concept of hand quilting conjures the image of slow stitching, I found that it did not take as much time because I was making bigger stitches and covering a lot of space in a short of period.

embroidery thread
Perle cotton embroidery thread

3) Creates a whimsical organic look or unique factor

Handmade items have a unique human touch, which brings subtle imperfections that can make items more distinct and organic. Naturally your stitching will look different based on how you feel. When I feel stressed, my stitches look tighter and closer together than when I am relaxed. If you want your stitching to look even, mark dots evenly with an erasable pen such as Sewline and Fixxon and a ruler. Test the pen on extra fabric first to make sure you can remove the marks if needed. If you forget to test, it’s not a big deal – the thread will probably cover the marks.  You see another a bonus for using perle cotton thread for quilting. For those who have Natalie Chanin’s book, “The Geometry of Handsewing,” there’s an added benefit. The plastic templates found in the book can serve as valuable guides for achieving the desired spacing and patterns. This insightful tip was inspired by Quilters Candy.

4) Very portable!

I didn’t have to sit at my sewing machine, which lives in my dining room that’s more of a craft room now. I hardly dine in there now and the number of sewing supplies outnumber the china and refined cutlery in my china cabinet. I used a 11 x 11 q-snap frame while I was quilting. The set up was light and portable, allowing me to even quilt comfortably in bed. And in case you’re wondering, no, I didn’t fall asleep – that would be quite the scary scenario, right? Falling asleep with a sharp needle in hand (ouch!). The portability of hand quilting was a welcome change because it spared me the battle with my sewing machine, which has a narrow throat space. Trust me, most of the time, I lose that battle.

5) Living in the Moment

Slow stitching is a mindful activity. I am conscious of every stitch I make. Personally,  I can have moments where my mind will drift off while I am machine quilting because I do not have to be too engaged since the machine is doing bulk of the work. Now an argument could be made that free form machine quilting could be more mindful since you are more involved in the quilting process as you are thinking about the pattern you are designing in the quilt. However, I enjoy the process more of hand quilting because it feels more intentional and this is important for me when I am creating.

Each time I look at my finished quilt, I realized I made the right choice to hand quilt. The fun bold colours in the fabric and thread choices make the quilt looks so unique and whimisical. 

What is your go-to method for quilting? hand quilting or machine quilting? Leave a comment below. 

Until next time, keep making the things you love!

hand quilting baby blanket
Finished hand quilted blanket