It feels wonderful to be getting back into the rhythm of making again. Even though I haven’t been sharing much about my projects during the latter part of 2025 and the start of 2026, I’ve still been busy creating. Life gets hectic sometimes and can pull me in all sorts of directions, making it easy to lose my footing. I really miss putting my thoughts on paper and connecting over my love for making. So, I’ve decided to jump back in—no guilt, just a fresh commitment to why this blog exists: to feel connected again and see where the journey takes me in the making community.
What Have I Been Up To?
Lately, weaving and spinning have captured my heart, especially working with locally sourced wool. If you’ve followed my earlier posts, you know I’ve been bringing raw fleece to a local fiber mill, Wool 4 Ewe, and getting it processed into roving to spin on my wheel. I spent much of last year and even this year spinning that fleece into yarn for weaving projects. One big goal was to spin enough yarn to use as weft for a couch throw I made for someone. After finishing that project on my larger 45-inch Leclerc Fanny loom, I felt inspired to keep spinning for more throws—and maybe even bigger projects like a twin-size coverlet measuring about 60 by 80 inches.
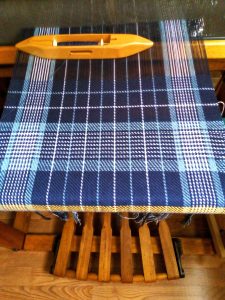
Handwoven throw in progress on my 45inch Leclerc Fanny Floor loom
For my previous project, I used an 8/2 cotton warp set at 16 ends per inch, as recommended in a book about traditional coverlets by Helen Jarvis. The single-ply wool yarn I spun was about DK weight. After wet finishing and drying, the blanket had a scrumptious drape—cozy for chilly nights, and light enough to hang nicely on the couch.
Current handwoven throw in progress. Weaving with 2 ply handspun yarn.
On my smaller antique loom, I’ve been weaving hand towels using Venne organic cotton 8/2 yarn, a new discovery for me. I’ve been mixing purples in a shadow play pattern from a Nov/Dec 2021 Handwoven magazine issue. I often wonder about the difference between regular cotton and organic cotton. Honestly, after washing and drying on low, these towels feel so much softer in hand. I’ll definitely revisit Venne organic 8/2 cotton yarn—it seems worth the extra splurge!
Knitting has been a bit slower lately. I’ve been working on finishing a pair of socks using hand-dyed yarn from a swap partner (who dyed it herself!). I tried using the yarn in different projects, but didn’t love how it looked, so I boldly ripped it out and kept hunting for the right pattern. This lace pattern I’m working with now lets the yarn’s color variation shine without pooling too much in any one spot.
Current handknit socks in progress using hand-dyed yarn
Looking Ahead: Goals for 2026
My main goal for 2026 is more spinning and weaving—no surprise there—especially using natural, locally sourced fleece in new weaving projects.
I also want to get back into knitting sweaters. I’ve spun yarn for sweaters before but sometimes get distracted by quicker projects. Although prepping samples and doing gauge swatches isn’t my favourite, I know it’s important for getting the right fit. Right now, I have some alpaca yarn from a local fiber mill that I hope to use. I have my eye on a few patterns, but I’m not rushing—finding the perfect sweater pattern for that yarn is part of the fun!
I’m sure there will be more projects popping up and joining my to-do list, since I like to keep things flexible and let my creativity lead the way. Until next time, happy crafting—and I’ll be back soon to share more adventures!
Back in June, I made the long trek—nearly an hour and a half—to Camilla Valley Farms, a local weaving supply store. Every trip there feels like a mini pilgrimage, so I always go with a well-thought-out plan of which yarns I need to stock up on. When it comes to weaving, choosing the right yarn is just as crucial as the pattern or loom—it can truly make or break a project. Each fiber and yarn construction behaves differently on the loom and transforms uniquely in the finished fabric. I wish someone had explained this to me when I first started—it would have saved me countless hours and a few frustrating mistakes! Whether you’re just beginning or have years of weaving under your belt, knowing the characteristics of different weaving yarns can help you choose the perfect material for your next project—and bring your creative ideas to life.
Here’s a breakdown of the most commonly used weaving yarns, along with what makes each one special:
1. Cotton
Cotton is a staple in the weaving world. It’s soft, strong, easy to work with and generally affordable in comparison to other types of yarn. It is one of the first weaving yarns that I worked with as a beginner weaver.
Best for: Towels, napkins, clothing, baby blankets
Pros: Absorbent, durable, doesn’t stretch much
Cons: Can shrink if not pre-washed, less elasticity
Popular cotton yarns for weaving:
8/2 Cotton: Great for dish towels and lightweight fabrics
10/2 Cotton: Finer than 8/2, ideal for scarves, delicate table runner or other fabrics.
8/2 cotton weaving yarn
cotton hand woven kitchen towel
2. Linen Yarn
Made from flax fibers, linen has a crisp feel and adds a classic, elegant look to any woven project. A yarn that I recently started to use to make some hand towels for my friends wedding gift Hopefully with linens great durability they can be past down to future generations.
Best for: Table linens, summer wear, curtains
Pros: Strong, gets softer with use, beautiful drape
Cons: Stiff to start, can be tricky to tension
Tip: Wet-spun linen works better for warp than tow linen due to fewer slubs and more strength. Also, keep a water spritz bottle close by while weaving so it can be used on the warp to help the yarn to relax.
linen handwoven kitchen towel
3. Wool yarn
Wool is a weaver’s dream for softness and warmth. From my limited experiences It has a natural elasticity that makes it forgiving on the loom. I have only used it small projects such as decorative pillow covers and scarves. I hope to make couch size throw with my recently restored 45 inch Leclerc Fanny weaving loom.
Best for: Blankets, scarves, clothing, tapestry weaving
Pros: Warm, elastic, felts easily for finishing
Cons: Can shrink/felt if not washed carefully, may be too stretchy for some warps and depending on the brands the cost.
Types to consider:
Worsted spun wool: Smooth and strong, ideal for warp
Woolen spun: Softer, more textured, better for weft or softer drapes like scarves
handspun wool yarn
The remaining weaving yarns listed below are on my list to try soon:
4. Silk yarn
Silk brings luxury and sheen to woven fabrics. It’s strong and drapes beautifully.
Best for: Shawls, scarves, dressy garments
Pros: Lustrous, incredibly strong for its weight
Cons: Can be slippery, more expensive
Variants include:
Bombyx silk: Smooth and shiny
Tussah silk: Slightly matte and more textured
5. Bamboo yarn
Bamboo yarn is soft, shiny, and has a cool feel against the skin.
Best for: Summer wear, scarves, baby items
Pros: Hypoallergenic, sustainable, smooth
Cons: Can split easily, may need careful handling as warp
Choosing the Right Yarn: Warp vs. Weft
Warp yarns need to be strong and low stretch—cotton, linen, or strong wool work best.
Weft yarns can be more varied—this is your opportunity to play with texture, color, and fluffier or softer yarns.
Final Thoughts
The world of weaving yarns is vast and exploring it can be a fun part of your creative process. As you experiment with different types, pay attention to how each fiber feels on the loom and in the finished fabric. I am learning not to be afraid to mix and match!
Whether you’re weaving a functional kitchen towel or an expressive wall hanging, choosing the right yarn makes all the difference.
Do you have a favorite type of weaving yarn? Or a project where a certain yarn surprised you? I’d love to hear your experience in the comments below!
Finally, Floor Loom is refurbished and put back together!
It has been little over a year since I picked up this 1980s 45 inch Leclerc Fanny Floor Loom and brought it home to live with me. The previous owner was not using it any longer for health reasons and generously decided to give it to me hoping that it would be brought back to life. That is exactly what happened! For those who followed from the very beginning of this journey saw and read what steps I took to remove the old varnish and revarnished using a hard wax oil. I did not keep track of the exact number of hours I dedicated to this project and truthfully, I am glad I didn’t because it would deter me from doing anything like this again. I found renewed appreciation for the company, Leclerc who make these looms because it takes a lot of work to get a loom looking beautifully and functioning well. It is not my first time setting up a loom but I did underestimate the time and man power it would take to put it together. This loom is much bigger than my other loom which is actually 27 inch loom therefore it is a lot heavier to lift and more cumbersome to put it together in small space. But with help of my dad and a few hours of following the step by step instruction of manual we were able to put it together in 3 hours.
Original 45 inch Leclerc Fanny Loom
The loom is all put together so what is left? I have to make sure the harness (the part of the loom) that holds the thread are at the proper level. I am finding it the most tedious part of the process because it involves rebalancing how the harness seat on the horizontal bar. It has been at certain height and leveled.
The next thing I must do is add more heddles to the harness so I can add more yarn/thread to make larger projects such as lap blankets. Each harness had approximately 50 heddles on each one and I need to have at least 150 heddles to make those large projects. Adding the heddles must be done precisely so that they are oriented properly so the thread/yarn is not twisted and possibly snap while weaving.
Varnished and assembled Leclerc 45 inch floor loom
Lastly, I have to remove the rust of one the reeds which helps to spread the individual yarn thread properly while weaving. I plan to use Bar keeper friends that you can get your local hardware store and make a paste out of it with water and cover the bars within the reed with it. After some scrubbing with a fine steel wool pad and letting it sit for a few hours then it can be rinsed off. Why not just buy a new one? They are not inexpensive, and it would be good if I could save them from ending up in a land fill.
What is the first thing I plan to weave on this loom you may be wondering. I plan to weave a lap size blanket using an 8/8 cotton which is almost equivalent to worsted weight yarn, so it is relatively thick yarn and weaving it in a simple plain weave structure. It will give me the opportunity to make the last fine tune adjustments to the loom so the shed (the area which yarn travels across the warp thread) is large enough.
Winding on the warp for the lap blanket
So far the floor weaving loom is working well. As you can see by the picture the warp is already put onto the loom and the yarn threads are in bundles waiting to be threaded into the heddles. I am so excited to show you the lap size blanket when it is completed please check out my Instagram feed for those pictures. Let me know what you think about my refinished loom in the comments below and thank you for following me on this journey.
The start of 2025 has been a busy one as I work to catch up on some of the projects I started last year—projects I had optimistically hoped to finish before the year ended. The biggest and most important of them all? Refurbishing the floor loom I acquired early last year.
The Restoration Process
During the summer months, I sanded the loom down to bare wood using a combination of a Black & Decker Mouse sander and good old-fashioned hand sanding. It was a big job, and I completely underestimated how long it would take. My initial goal was to complete the sanding by late fall, but thankfully, the weather held up long enough for me to continue working outdoors. When it came time to varnish, I opted for Osmo PolyX Oil—a product I had never used before but discovered through Felicia Lo’s YouTube video on refurbishing her Fanny loom. I was drawn to this finish because of its low fumes (since I’m sensitive to strong scents) and its ability to enhance the natural beauty of the maple wood without an overly glossy finish.
Finding the Right Varnish
Osmo PolyX Oil wasn’t readily available at my local hardware stores, so I had to do some searching. I found it on Amazon and Lee Valley Tools, with the latter offering a better price—so that’s where I made my purchase. They had two sizes available: 125ml and 750ml. Estimating how much I’d need was tricky since, unlike flooring, I couldn’t easily calculate the square footage of wood I’d be covering.
The Application Process
Applying the oil has been much easier than expected! The varnishing process is moving along quickly, as a little bit of PolyX Oil goes a long way. I purchased staining pads from my local hardware store to ensure an even, thin coat. To make application easier, I cut the pads into small rectangular pieces that fit inside the container. So far, I believe the small container will be enough to complete the project, but I’m considering getting another one—just in case. I’d rather not risk running out when I’m so close to the finish line! The oil requires two coats with an eight-hour drying time between applications, but thankfully, no sanding between coats is necessary—definitely a plus in my book.
How It’s Coming Together
I’m loving how the loom is turning out! It doesn’t look brand new, but that was never my intention. Instead, it looks refreshed and beautiful. Once varnishing is complete, I’ll apply a wood conditioner to enhance the sheen, give it a smoother feel, and provide extra protection against dry conditions. At this point, I have just a few more pieces to varnish. After that, I’ll assemble the loom and make sure everything fits together properly. The last major task is removing some rust from one of the reeds—then I’ll officially be done!
What’s Next?
I can’t wait to see this loom in action. My biggest motivation for completing this project is getting it up and running with a weaving project. Plus, I’m excited to update Grace, the loom’s original owner, on its transformation. If you missed Part 1 of this restoration, you can check it out [link here]. Stay tuned for a future blog post where I’ll share the final reveal!
Have you ever restored a floor loom or considered taking on a similar project? I’d love to hear about your experiences—feel free to leave a comment below. Until next time, happy crafting!
If you’ve ever worked with handspun yarn—or are thinking about it—you’ve probably wondered: Is there a plan for what this fluff will become? The truth? Sometimes yes, but often no.
For me, spinning yarn is more about the process than the product. The rhythmic hum of the spinning wheel, the tactile pleasure of the fiber slipping through my fingers, and the anticipation of how the colors will blend together are the reasons I spin. Sure, I love seeing the final product—whether it’s a cozy sweater or a woven scarf—but by the time the yarn is finished, I’m often already dreaming about the next fleece or hand-dyed fiber I’ll spin.
Still, the magic doesn’t stop at spinning. The real adventure begins when you start working with your handspun yarn. Here are a few things I’ve learned along the way, which might help you as you embark on your own handspun projects.
2 ply fingering weight handspun yarn
1. Understanding Your Yarn’s Structure
When using commercial yarn, we often choose based on its thickness or weight, categorized as lace, fingering, sport, DK, worsted, aran, or bulky. With handspun yarn, determining the weight is a bit more hands-on.
I use a wraps per inch (WPI) tool—a simple ruler will do! Wrap the yarn around the ruler for one inch, count the wraps, and compare it to a WPI chart to find its weight.
The number of plies also affects the yarn’s thickness and structure. A two-ply yarn is versatile and works well for most projects, offering a balanced feel and good stitch definition. For sturdier projects, like socks or outerwear, a three-ply yarn provides more roundness and strength. Even the way you ply matters—traditional plies versus chain plies can change the drape, durability, and overall look of the finished project.
2. Swatching: Your Yarn’s Test Drive
Swatching might feel optional, but it’s incredibly informative, especially with handspun yarn.
A small swatch can reveal:
Color changes: How do the hues transition from one to the next?
Stitch definition: Will the yarn’s texture shine in cables or lacework?
Drape: How does the fabric feel and move?
For knitters and crocheters, swatching helps you decide on patterns that highlight the yarn’s unique qualities. For weavers, a sampling step can help determine the fabric’s density (ends per inch) and ensure your yarn is suitable for the weave structure you have in mind.
weaving overshot sample with handspun yarn
3. Choosing Patterns or Weave Structures
When it comes to handspun yarn, the possibilities are endless. You can work with nearly any pattern—as long as you can match the required gauge.
Personally, I gravitate toward simple designs that let the yarn take center stage:
Knitting: Garter stitch and stockinette stitch allow the natural variations in handspun yarn to shine.
Crocheting: Simple, repetitive patterns enhance the yarn’s beauty without overwhelming it.
Weaving: I’ve found that using handspun yarn as weft yarn in overshot patterns adds stunning texture and depth. For single-ply yarns, plain weave structures beautifully highlight the yarn’s natural striping, especially when it’s multicolored.
A great resource for selecting knitting or crochet patterns is Ravelry’s pattern browser. You can filter by yarn weight, yardage, and even specific attributes to find a project that fits your handspun perfectly.
Knitted sweater using handspun yarn on display at Shuttlebug Handweavers and Spinners Open House
The Journey of Handspun Yarn
Working with handspun yarn is more than just crafting—it’s an exploration of creativity and texture. Each skein holds a story, from the fiber it once was to the fabric it will become. And as much as I love the finished products, it’s the journey—the hours spent spinning, swatching, and creating—that brings me the most joy.
So, if you’ve been hesitant to use your handspun yarn, don’t wait! Embrace the process, experiment with patterns, and discover the magic hidden within each handmade skein.
Happy spinning—and even happier creating!
What’s your favorite way to use handspun yarn? Share your experience in the comments below!
Earlier this year, I had an incredible opportunity to tour my local fiber mill, Wool 4 Ewe, when I dropped off my raw sheep fleece to be processed. This was my first time visiting a mill and seeing the steps involved in transforming raw fleece. Historically, I’ve always spun from roving that was already pre-processed and hand-dyed, so taking part in the entire journey—from washing to carding and spinning—felt like a whole new world. You can review more details in my past blog post, Processing Wool Fleece at a local mill: Lessons learned.
I recently received the email that my fleece was finally ready for pickup. After months of anticipation, I couldn’t wait to see the results of the processing. The raw fleece I brought in weighed around 5.395 pounds, and after scouring and processing, it yielded five beautiful bumps of 110-gram roving each. Now, if you’re doing the math, you might notice a discrepancy in weight. The difference stems largely from removing the lanolin in the scouring process, which can reduce the original fleece weight by up to 30-40%.
Heading into the picker
fleece heading into the carder
sheep roving
Ann, the owner of Wool 4 Ewe, kindly documented the processing steps with photos, showcasing the journey from a raw, lanolin-rich fleece to clean, fluffy roving. The fleece underwent several stages: it was first scoured (washed) to remove dirt and lanolin, then picked and carded to untangle and align the fibers, and finally drafted into rovings. The transformation was amazing, and I now have five soft bumps of roving, ready for crafting.
What’s Next for My Valais Blacknose Roving?
Now that I have the roving in hand, I’m contemplating what to make with it. This is my first time working with Valais Blacknose wool, and it’s known for its long staple length, which is ideal for spinning into a single-ply yarn. My goal is to achieve a sturdy single-ply with minimal fraying and piling, allowing me to use it for multiple projects. I’m leaning towards incorporating it into an upcoming weaving project, but I’ll need to assess how it feels once spun—if it’s too scratchy for wearables, it may be better suited for items that won’t sit directly against the skin, like a cozy throw.
One possibility I’m excited about is exploring rug hooking with this roving. The fluffy, dense texture would work well to create soft clouds in scenic designs or even the illusion of fur or textured details in animal motifs. Another practical use I’m considering is using the roving as a natural stuffing for pillows or knitted toys. Typically, I use polyester filling, but I’m shifting toward more sustainable materials, and the density and softness of this roving would provide fantastic definition and texture for stuffed crafts.
The Joy of Using Local Fiber
Using local wool has added a special connection to my crafting. Knowing that the fibers came from a nearby farm and were processed at a local mill makes each project feel more personal and intentional. Supporting local farmers and fiber mills has also become a meaningful part of my journey as a crafter. This experience has been such a joy, and I’m excited to keep building my stash with locally grown fibers! Are you currently working with locally sourced fiber? Please feel free to comment below, I would love to hear from you.
Where do I begin? How did I end up with this loom? I wasn’t searching for a floor loom since I already have a 1920s 36-inch Leclerc Mira that works well for me. But when I found out that a 45-inch Leclerc Fanny was available for free, I couldn’t resist. I saw pictures of it and imagined what might happen if I didn’t save it. The loom was a bit worn out, but nothing that hard work couldn’t fix. The important parts were intact; it just had some cosmetic issues like scratches and dents. While I don’t mind a few scratches, there were too many for my liking, especially since this loom will be in a prominent spot in my home. So, I decided to take you along on my journey of refurbishing this 45-inch Leclerc Fanny.
45 inch leclerc fanny loom
Step 1: Identify what needs fixing and make a list of tasks to complete.
Here is the list I have to date. This list may change over time during the process of refurbishing this loom.
Remove the scratches and minor dings by sanding the old varnish.
Varnish wood with 2 coats.
Replace the rusty heddles with new wire heddles or possibly texsolv heddles (made from polyester and lightweight in comparison to wire heddles)
Scour and clean rusty reeds
Replace friction brake (metal circular band)
Step 2- Tackle the most important and biggest job first!
At this stage, I’m focused on sanding. With the summer weather, it’s perfect to do this messy work outside. I’m not new to sanding, having started a coffee table project before, though I didn’t finish it. I learned from a Sweet Georgia YouTube video that I need three grades of sandpaper: 60 grit to remove old varnish, 120 to smooth the wood, and 220 to sand between coats. I’m using a Black and Decker mouse hand sander for larger areas and sanding by hand in tighter spots. Ideally, I would remove all the hardware first, but I didn’t want to fully disassemble the loom, so I’m doing more hand sanding. As I strip the old varnish, the original light wood color is revealed, while areas like the logo will keep the darker aged wood color. I’m not aiming to make the loom look brand new, just cleaner and more polished. I’ll see if my approach was the right one once the project is complete!
I’m still sanding and haven’t kept track of the hours spent, but I know it’s taken a lot of time. My next task will be scouring and removing rust from the reeds or varnishing the loom, which I’ll cover in another blog post. As you can see, there will be a series of posts about refurbishing the Leclerc Fanny, and I’m excited to share this journey. If you’ve ever refurbished a loom, feel free to comment below!
I came across an old weaving pattern from the January/February 1994 Handwoven Magazine called “Winter Lichen Towels” by Jean Scorge. It featured two main aspects I wanted for my new project: 1) the twill color weave technique, and 2) a geometric/block design. These were not my usual preferences, but I was eager for a challenge and something different. However, the most significant challenge I faced with this project was creating a fresh color scheme to give it a modern twist.
Understanding color theory wasn’t easy for me, despite being creative. Picking colors that worked well together to enhance my projects didn’t come naturally. I usually preferred darker shades like black, navy, and charcoal because they felt comfortable to me. Mixing colors with similar darkness seemed safe, but it often resulted in losing the design’s impact. Even though I knew about primary colors and how they combine to form complementary, secondary, and tertiary colors, I still lacked confidence in choosing colors wisely. However, watching Gail Defrusne’s video “The Value of Values” changed my perspective. Her approach of considering values, or the darkness or lightness of colors, helped me select colors and plan designs more efficiently and effectively.
updated Winter Lichen handwoven towels
The original colors in the pattern were sage green, white, and charcoal. While I liked each color individually, the combination felt dated with this pattern. Instead of relying on the color wheel for inspiration, I chose to visualize the pattern in grayscale, akin to pencil shading. In the future, I plan to take a picture of the pattern and apply a black and white effect for a quicker reference. Then, I organized my stash of 8/2 cotton into dark, medium, and light tones. I opted for navy as the dark color, denim blue as the medium tone, and white as the light tone. The next step involved deciding where to place these colors within the geometric design to highlight the contrast between dark and light. In the border section of the pattern, I alternated colors every two rows (picks of weaving) to draw attention to this detail. Alternating navy and white, which offered the most contrast, seemed the logical choice. Seeing the prewashed finished towels, following the original weaving pattern, I’m thrilled with the result! It brings a refreshing update to the older pattern.
For the next two towels, I’m changing the weaving pattern to incorporate more color blocking. One towel will feature a solid block of navy, while the other will alternate navy and white every four rows (picks). I’m hoping that this weaving style will give the almost vintage pattern a modern twist. Check out this sneak peek video below to see how it’s coming along!
Exploring color more deeply, especially from a value perspective, has been really fulfilling. It’s pushed me out of my comfort zone of sticking to dark colors and choosing hues solely based on their position on the color wheel. I’m excited to apply this new approach to color planning and selection in all my future projects. How do you typically select colors for your projects? I’d love to hear your thoughts! Please comment below.
After the holidays, with a tight budget, I’m exploring creative ways to utilize the scraps of materials I’ve gathered over the years. Admittedly, I find it challenging to part with things, always believing I’ll find a future use for them. Whether that labels me a packrat or a hoarder, I’ll leave that question unanswered! This month, out of necessity, I’ve put my collection of wool strips, fabric scraps, yarn balls, and woven fabric pieces to good use, sparking fresh ideas for their creative application. This surge of inspiration has prompted me to share some current crafting projects and future plans with you.
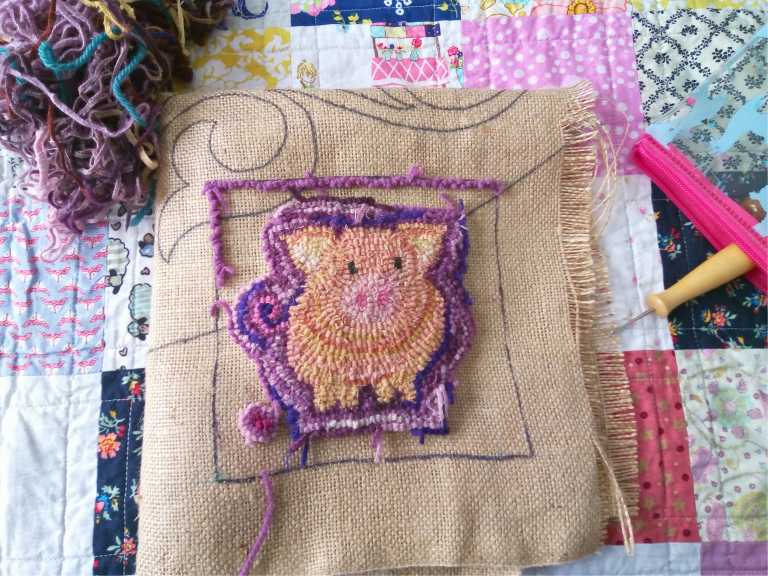
1) Using leftover wool strips to hook a mug rug
I must admit, I am addicted to rug hooking right now and I am eager to learn all there is to know about it. Fortunately, I know someone who has been hooking for years and graciously shared her knowledge and wool stash with me. Using a scrap bag of wool strips (often called “worms” in rug hooking), I designed a mini mug rug for a friend. Who knows, it may end up being used as a decorative feature in another crafting project! This experience taught me to experiment with new colors I don’t usually gravitate towards, work with smaller wool strips, and modify designs based on available materials.
hooked pig mug rug
2) Using fabric scraps to make a pincushion and mini quilt
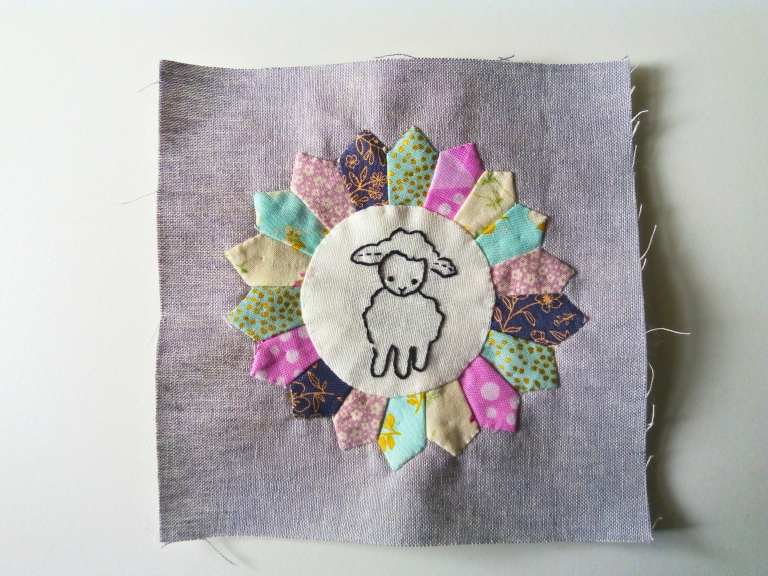
I have a 9×12 plastic bin where I keep all my fabric scraps from previous quilting projects. I limit it to that size to encourage myself to buy only the fabric I need for each project, but it’s still filled with tiny pieces of fabric that I didn’t know what to do with. Recently, I was inspired by a crafting YouTube channel called Crafty Cottage Stitches, which is hosting a #pinkeep social. The idea is to make different kinds of pin cushions using whatever materials you want. It was a light bulb moment for me! My bin of fiber scraps would be perfect for this project. Instead of just using random small pieces of fabric to make a multi-color rectangle and stuffing it with fiber fill, I remembered the Mini Dresden pin cushion pattern by Deidra McCollum from Quilty Obsession that I’ve had for more than 5 years. I was initially intimidated because I wasn’t familiar with hand applique and felt more comfortable sewing bigger pieces of fabric. However, I decided to give it a try. I used Amy Sinabaldi’s free embroidery pattern of a sheep to decorate the middle of the Dresden plate on the front panel of the boxed pin cushion. I can hardly wait to see the final product! Now that I’m looking at it, though, I don’t think I can even use it as a pin cushion—it’s too cute! 😊
mini pin cushion using fabric scraps
The pincushion wasn’t the only idea that came to mind when brainstorming what to do with my fabric scraps. A couple of months ago, I came across a workshop at one of my local quilt stores called kawandi quilting. After some research, I discovered that it involves hand-sewing pieces of fabric onto a larger piece to create a quilt. As you may know from my previous posts, I’m a big fan of hand embroidery. In fact, my first post was titled “The Great Quilting Showdown: Machine Quilting vs. Hand Quilting.” This is a project I plan to learn on my own, as there are several great YouTube tutorials available, like this one, How to Make a Kawandi Inspired Quilt, that shows you how to do it.
3) Using handwoven fabric samples to make ornaments
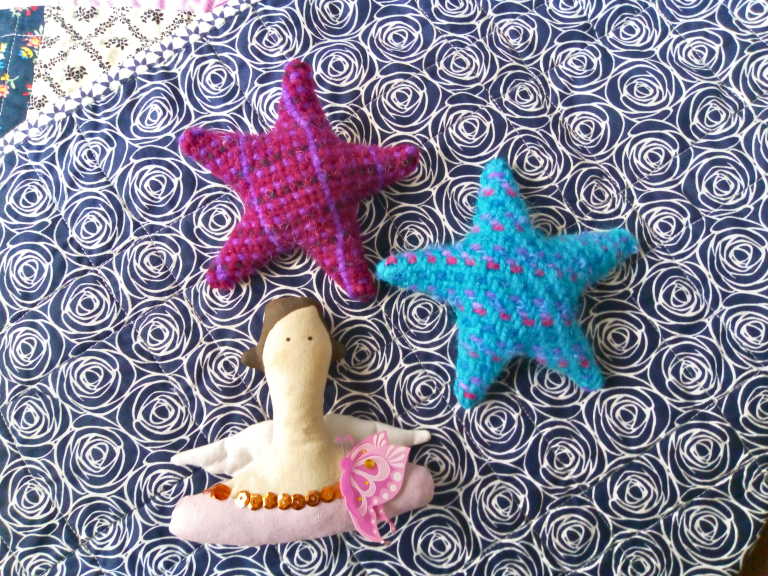
Initially, I was hesitant to admit that I might have a tendency to hoard crafting materials. You might think my collection of handwoven fabric pieces supports this idea. However, it sort of fell into my lap, so to speak. My weaving teacher was clearing out her cabinets of handwoven fabric samples and offered them to students like me. At the time, I didn’t know what to do with them, but they were free and beautiful, so I accepted them. Recently, I’ve been contemplating some personal designs that incorporate handwoven fabric. I’m not sure yet what these stuffed star ornaments will ultimately become—whether they’ll be part of a larger design (which I’m leaning towards) or a standalone project. Perhaps I’ll even fill them with lavender or other dried scented flowers. Regardless, I love how they turned out—soft and squishy.
sewn star ornament with hand woven fabric samples
This year, I’ve been focused on expanding my creativity by experimenting with materials in new ways and exploring different design approaches. Projects like the ones mentioned above have been particularly inspiring, and I’m eager to see how they develop in the coming weeks as I continue working on them. I’m committed to staying on this creative journey and discovering what other projects and designs emerge as I let go of the need to strictly follow patterns and instead embrace thinking outside the box. What about you? What projects are you currently working on that involve working with scraps? Feel free to share in the comments below!
Happy New Year, fellow makers! I hope you had a wonderful holiday season. Reflecting on 2023, I achieved many crafting goals, reconnecting with weaving and rug hooking. With the start of a new year, it’s time for fresh beginnings. I feel inspired to set new crafting goals and face new challenges in 2024. While I have exciting plans ahead, I also aim to complete lingering projects from previous years. As time passes, my project list has grown, and it’s time to make progress. Today, I want to share my crafting goals for 2024, hoping to stay focused and accomplish them!
1) Turning hand embroidered pieces into a complete finished object
I’ve been doing hand embroidery for a while now and I enjoy it immensely. It was my first venture into needlework and felt less daunting than cross-stitching. Taking an embroidery class on Craftsy for basic stitches helped too. I’d turn to this craft sporadically when I wanted something requiring less concentration but keeping my hands busy. Over the years, I’ve embroidered a small collection of 6-inch squares using designs from my favorite craft designers like Kathy Schmittz and Sarah Jane. Now, I’m pondering how to best arrange them into a project. I’ve checked the ‘Big Book of Hand Embroidery Projects’ for ideas, but I’m still uncertain about what to do next.
So what is holding me back from making a decision?
How to arrange them in a way to highlight each hand embroidered piece so they do not compete but still go well together.
Is it practical? Will I use it or store it away to collect dust.
I will have to design a layout especially if I plan to put into a wall hanging or mini quilt.
Decisions, decisions, decisions!!
6x6 inch embroidered pieces of linen
2) Practicing piecing and aiming for precision in quilting!
A few crafting friends and I decided to take on the Riley Blake Design Block Challenge this year, pushing me to explore more challenging aspects of quilting. I typically stick to standard piecing with straightforward stitching and minimal cutting. As I delve into the challenge, I’ve gone through my fabric stash, considering colors and deciding whether I need to add a couple more fabrics to achieve the desired finished quilt size of around 60 x 60 inches. I’ve successfully completed Block #1, Vintage Delight, piecing together various units to create an almost squared 10.5 x 10.5 block.
#RBDblockchallenge Vintage Delight quilting block
3) Weaving more with my handspun.
I’m expanding my weaving projects by using more of my handspun yarn to create fabric for future original designs, like small bags and household décor items. To accomplish this, I need to produce more handspun, but luckily, I have a good stash of fiber. Currently, I’m spinning some vibrant Corriedale fiber dyed by Funky Carolina, enjoying the colors as I spin. Additionally, I’ve acquired new fiber to spin. I’m considering spinning them as singles and then weaving them with another neutral-colored single-ply wool yarn, using a tight plain weave structure.
handspun yarn singles
4) Rug hooking an original design!
What is my original design involving? Of course, a sheep! Freestyling the drawing onto a piece of primitive linen foundation cloth using a sharpie, the design is approximately 6 x 6 inches and is intended to become a small wall hanging for my craft room. I plan to use leftover wool strips from a previous project, specifically hooking a sheep from the Buttermilk Basin pattern called Patriotic Sheep. Despite struggling to shift focus from this enjoyable project to complete others, it has inspired me to design more rug hooking patterns soon.
my rug hooking sheep design
These projects represent just a few on my to-do list for 2024, and I’m excited about completing them and sharing the finished pieces with you. Despite having a list, I’m leaving room for new inspiration and creativity to emerge. That’s the fun part of crafting – seeing where it takes you. Most of the time, it turns out better than you can ever imagine. What are your crafting goals for this new year? Please feel free to leave a comment below.