Winter Crafts: Staying Busy & Cozy

Winter has never been my favorite time of year. My dislike of snow and the chill in the air often encourages me to hibernate. I could easily spend my days nestled under a pile of blankets with a cup of hot tea, binge-watching my favorite crafting channels on YouTube. However, instead of letting the season pass me by, I’ve found joy in celebrating winter through craft projects that reflect its unique beauty. Surprisingly, these colder months have become some of my most productive and enjoyable times. Here are a few of the projects I’ve been working on to stay cozy and creative.

Winter Wreaths

I’ve always admired seasonal wreaths but had never made one myself until this winter. Unlike holiday-specific designs, I opted for a seasonal winter theme so the wreath could stay up longer and reflect my personal taste.
To make my wreath, I started with a base from Michaels to eliminate the challenge of shaping the frame myself. The decorative elements, however, were entirely handmade. I’ve been making soft toys for years, but for this project, I shrunk the patterns to create ornaments that fit within the wreath. This required some adjustments, like using a smaller stitch length on my sewing machine and slowing down while sewing. Tools like hemostats were lifesavers for turning out tiny pieces like arms and stuffing them with poly-fil.
I also made fabric stars to add to the wreath, using both handwoven and commercial fabric. The handwoven ones, with their unique textures, turned out to be my favorite. The result was a wreath that felt both personal and perfectly suited to the winter season.

winter wreath soft toy
handmade winter wreath

Macramé Snowflakes

macramé ornament
Christmas macramé star ornaments

These delicate macramé snowflakes were inspired by a fellow guild member. A few years ago, my guild hosted a workshop on making snowflakes, but I wasn’t able to attend. Fortunately, my friend gave me a personal lesson using the pattern “Wish Upon a Star” by Annie’s Kit Clubs.
The project required minimal supplies—just wooden rings (about 2 inches in diameter) and twine, both of which I found at Michaels (and, of course, used a 40% off coupon for a great deal!). While the pattern included clear written and visual instructions, having someone demonstrate in real-time was invaluable for me. So far, I’ve made six snowflakes, which are now proudly displayed on my wall. The process is so relaxing and satisfying that I plan to make many more.

Rug-Hooked Standing Ornament

Rug hooking is a craft I’ve loved for years, and lately, I’ve been exploring its versatility beyond traditional rugs. This winter, I came across a pattern for a standing ornament in an older issue of Rug Hooking magazine and decided to give it a try.
I enlarged the design and used #3 wool strips (3/8th inch wide) to hook the pattern. To add texture and visual interest, I experimented with pulling loops at different lengths and incorporating sculpting techniques. Buttons served as eyes for the gingerbread man in my design, and I’ve since sewn up the sides by hand for a precise finish. The ornament is stuffed with poly-fil, with some gravel-filled bags at the bottom to add weight so it can stand upright. I’m still on the hunt for the perfect bell to finish off the top, but I’m thrilled with how it’s coming together.

rug hooked christmas elf
Rug hooked Christmas elf

Hand-Embroidered Sheep Ornaments

If you know me, you know I’m obsessed with sheep, and I’ll incorporate them into my crafts whenever I can. This winter, I’ve been making hand-embroidered sheep ornaments that are as adorable as they are resourceful.
For the fleece, I used crewel wool to create French knots, while the faces were satin-stitched with black embroidery thread. I made little caps for the sheep from tiny wool scraps that were too small for other projects. As for stuffing, I used both poly-fil and leftover fleece from a spinning project. I’ve been leaning towards fleece lately as it gives a firmer yet soft feel to the ornaments.
To make the most of my leftovers, I used scrap fabric for the ornament bases and even backed some with handwoven material. These ornaments are not only

sheep christmas ornament hand embroidery
Hand embroidered sheep ornament

Crafting has transformed winter from a season I used to dread into one that I can handle better. Each project brings warmth, creativity, and a sense of accomplishment. Whether it’s wreath-making, macramé, rug hooking, or embroidery, these crafts help me celebrate the beauty of winter while staying cozy and productive. If you’re looking for ways to brighten up your own winter days, I hope these ideas inspire you to pick up a new project or revisit an old favorite. What are you crafting during these winter months? Please feel free to comment below!

Happy crafting!

New Year, New Crafting Goals!

Happy New Year, fellow makers! I hope you had a wonderful holiday season. Reflecting on 2023, I achieved many crafting goals, reconnecting with weaving and rug hooking. With the start of a new year, it’s time for fresh beginnings. I feel inspired to set new crafting goals and face new challenges in 2024. While I have exciting plans ahead, I also aim to complete lingering projects from previous years. As time passes, my project list has grown, and it’s time to make progress. Today, I want to share my crafting goals for 2024, hoping to stay focused and accomplish them!

1) Turning hand embroidered pieces into a complete finished object

I’ve been doing hand embroidery for a while now and I enjoy it immensely. It was my first venture into needlework and felt less daunting than cross-stitching. Taking an embroidery class on Craftsy for basic stitches helped too. I’d turn to this craft sporadically when I wanted something requiring less concentration but keeping my hands busy. Over the years, I’ve embroidered a small collection of 6-inch squares using designs from my favorite craft designers like Kathy Schmittz and Sarah Jane. Now, I’m pondering how to best arrange them into a project. I’ve checked the ‘Big Book of Hand Embroidery Projects’ for ideas, but I’m still uncertain about what to do next.

So what is holding me back from making a decision?

  1. How to arrange them in a way to highlight each hand embroidered piece so they do not compete but still go well together.
  2.  Is it practical? Will I use it or store it away to collect dust.
  3. I will have to design a layout especially if I plan to put into a wall hanging or mini quilt.

Decisions, decisions, decisions!!

hand embroidery
6x6 inch embroidered pieces of linen

2) Practicing piecing and aiming for precision in quilting!

A few crafting friends and I decided to take on the Riley Blake Design Block Challenge this year, pushing me to explore more challenging aspects of quilting. I typically stick to standard piecing with straightforward stitching and minimal cutting. As I delve into the challenge, I’ve gone through my fabric stash, considering colors and deciding whether I need to add a couple more fabrics to achieve the desired finished quilt size of around 60 x 60 inches. I’ve successfully completed Block #1, Vintage Delight, piecing together various units to create an almost squared 10.5 x 10.5 block.

quilting block
#RBDblockchallenge Vintage Delight quilting block

3) Weaving more with my handspun.

I’m expanding my weaving projects by using more of my handspun yarn to create fabric for future original designs, like small bags and household décor items. To accomplish this, I need to produce more handspun, but luckily, I have a good stash of fiber. Currently, I’m spinning some vibrant Corriedale fiber dyed by Funky Carolina, enjoying the colors as I spin. Additionally, I’ve acquired new fiber to spin. I’m considering spinning them as singles and then weaving them with another neutral-colored single-ply wool yarn, using a tight plain weave structure.

handspun yarn singles bobbin
handspun yarn singles

4) Rug hooking an original design!

What is my original design involving? Of course, a sheep! Freestyling the drawing onto a piece of primitive linen foundation cloth using a sharpie, the design is approximately 6 x 6 inches and is intended to become a small wall hanging for my craft room. I plan to use leftover wool strips from a previous project, specifically hooking a sheep from the Buttermilk Basin pattern called Patriotic Sheep. Despite struggling to shift focus from this enjoyable project to complete others, it has inspired me to design more rug hooking patterns soon.

rug hooking sheep
my rug hooking sheep design

These projects represent just a few on my to-do list for 2024, and I’m excited about completing them and sharing the finished pieces with you. Despite having a list, I’m leaving room for new inspiration and creativity to emerge. That’s the fun part of crafting – seeing where it takes you. Most of the time, it turns out better than you can ever imagine. What are your crafting goals for this new year? Please feel free to leave a comment below.

Finishing My Cross Stitch Project: Adding The Magic Touch

Music: Underhill’s Angel by Geoffrey Castle

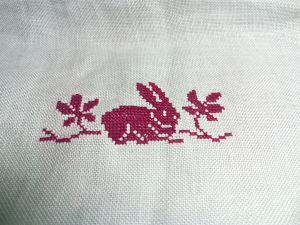
Hey there! I’m so excited to share my latest cross-stitching project with you! I absolutely adore cross-stitching, but I’ve always struggled with finding ways to display my finished pieces. Frames can be limiting, customizing them can be expensive, and finding enough wall space can be tough. But, one day I stumbled upon a wooden box while browsing at Michaels and I knew it was fate – it was the perfect way to showcase my latest project, a super cute cross-stitched rabbit! I thought it would be fun to share my experience with you and show you how I mounted my piece without ruining it. So, if you’re curious to see how I did it, keep reading!

cross stitch bunny rabbit
cross stitched rabbit

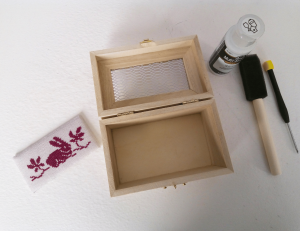
Supply List

  • Cross-stitched bunny size
  • White matt board
  • Upholstery thread by Coats and Clark
  • Pins
  • Unfinished hinged box size
  • Embroidery thread DMC#
  • Cord maker by Krenik
  • Hot glue gun
  • Finishing wax
  • Acrylic paint (folkfirt multisurface sateen acrylic paint) colour: cottage white
  • Foam brushes
  • Painters tape
  • Cotton batting
  • Scissors
  • Miniature screwdriver
wood box, foam brush, paint, cross-stitch rabbit bunny

Steps taken to complete the project

  1. Smoothed out the wrinkles on my cross-stitched piece using a hot iron on high heat and with steam. I don’t have to worry about the colors bleeding because DMC thread and linen were colorfast.

    2. Measured the opening of the box and cut a mat piece and cotton batting to that size. Fasten the linen to the mat board with pins and thread using a tutorial by Nicola Parkman on YouTube, I found helpful. I’ve done this lots of times before and it looks great!

    3. Glued the cross-stitched piece to the top of the wooden box with a hot glue gun after preparing the box. I took off the hardware, painted it with two coats of paint, and applied three coats of finishing wax using foam brushes.

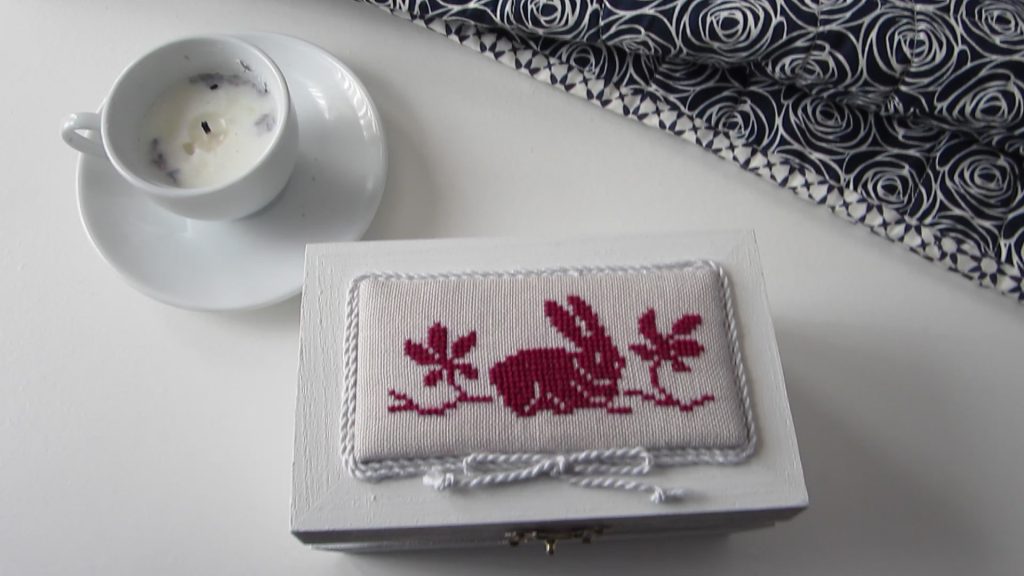
    4. Created cording by using a cord maker to ply six layers of embroidery thread together. Attach the cording with hot glue around the edge of the cross-stitched piece. Now, it’s complete!

    Overall, these are the steps I took to create a beautiful finished project.

cross stitch bunny rabbit box
Fully finished cross stitched project

I’m so happy with the way this turned out and I’d love to do it again for my other cross-stitched projects. I have a few more to finish. I’m also searching for other interesting items to display my cross-stitch on. For now, I’m going to use this piece to keep some extra materials like needles, ribbon, and buttons for future projects. 

What is your favourite method to complete your cross-stitched piece, feel free to let me know in the comment section below.  

Harvesting Creativity: Crafting This Fall Season

Music: Passage by Jakob Ahlbom & Trust in You by AK Silla

Nature is my go-to source of inspiration, regardless of the season. However, I must admit that the changing colors of leaves, the bright autumn afternoon sun, and the pine needles covering the forest grounds rekindle my imagination. I have a strong desire to recreate the mood of comfort, stillness, and crispness that I experience during my woodland walks in the fall. What crafts am I gravitating towards this fall to reflect this change of pace?

Rug Hooking

My current rug hooking  project is from an older Buttermilk Basin pattern called Patriotic Sheep. Using primitive cut wool strips (1/4 inch wide strips of wool) in rustic colours such as burgundy, mossy greens and burnt yellows. As you can see, I still have the main body to work on. I have a variety of creams and white wool fabric waiting to be felted and cut into strips. The final project will be a 3-dimensional sheep that will hopefully decorate my craft room.

rug hooking sheep
rug hooking sheep

Weaving

Weaving with my multicolored handspun using a crackle weaving structure. The pattern is called the French pattern, and it is from Marguerite Porter Davidson’s book, A Handweaver’s Pattern Book. This book has a great compilation of older weaving patterns, but using this pattern along with my multicolored handspun is giving this old pattern new life while preserving the vintage feel and look. I will admit my initial choice of a gray color was more subdued, but I am glad I changed my mind. This fall season is bursting with color, and I wanted my current projects to reflect this.

hand weaving
using my handspun to weave the French Pattern

Knitting

Knitting socks during this time of year, I am obsessed with staying warm and what I can make that will keep me warm. Naturally, my feet are the first part of my body that get cold quickly, and it is not even below 0 degrees. I start rummaging through my yarn stash to find the perfect yarn that is sturdy and warm enough to start a new pair of socks. Then, I finish all the last year’s sock projects by closing the toes and weaving all the loose ends.

pair of handknitted socks
striped hand knitted knee high socks

Punch needle

It is not a craft that I often work on, but I do enjoy it immensely when I do. This pattern is a Michelle Palmer original punch needle design, and of course, I was drawn to it because of the cute sheep design. It was featured in a summer 2019 issue of the Punch Needle and Primitive Stitcher magazine, but I felt the color selections in this design reminded me more of fall leaves that decorate the forest floor instead of summer flowers in full bloom. I have the pattern stretched on some wooden bars for increased accessibility while I am cuddled under some blankets and sipping on a hot cup of tea.

sheep punch needle
punch needle sheep design by Michelle Palmer

Quilting

I find binding quilts takes a long time when I make blankets. But it feels good to be under the blanket while doing it. I usually bind quilts in the fall, after piecing them together during the summer when there’s more daylight. It gets too hot to manoeuvre the blanket while hand-sewing the edges. I feel good when I finish because I have a new blanket to keep me cozy during the winter while I work on other crafts.

What crafts are you drawn to when there is a change of season, especially when the weather gets cooler? Please feel free to comment below!